 Categories
An Overlooked Solution For 'Virtual Event Fatigue'
There are countless articles, tweets, and LinkedIn posts from marketers and others expounding upon the future of virtual events and conferences; how ...
Have you ever gone mining underground and heard a zombie groaning from behind the cave walls, but couldn't tell if the zombie was in front of you or behind you? Perhaps you've installed a mod like Dynamic Surroundings to add a more immersive biome soundscape to your world.
One rather simple way to implement a sound engine in a game is to determine if a sound is on your right or on your left. If the sound is on the right side of you, the sound in your right ear will be louder, and if the sound is on the left side of you, the sound in your left ear will be louder. If the sound is farther away, then it will be quieter.
Minecraft: Java Edition actually uses an implementation of OpenAL for its sound engine. An OpenAL implementation can be much more sophisticated than just a “one dimensional” sound engine. Depending on what functionality is used, you can produce a realistic soundscape. But alas, using more sophisticated sound mixing comes with a nontrivial CPU cost.
I'm going to show you how we made a Minecraft Forge mod to add in-game spatialized voice chat using High Fidelity's Spatial Audio API. The API uses HRTF and other techniques to mix sounds in a realistic way that allows you to distinctly hear sounds from different directions while wearing ordinary headphones. It is also good at handling lots of sounds at once.
Most importantly for us is that we don't have to worry about having a high additional CPU cost on our local client, and High Fidelity's JavaScript Client Library is easy to use.
At this point you may be wondering: “Wait, but isn't Minecraft written in Java, not JavaScript?” And you would be 100 percent correct! For this reason, we have to use a few special techniques to get this mod to work. And the result, I'll admit, is by no means perfect. Nevertheless, we hope you enjoy learning how we made this Minecraft mod and that it is fun to hack on!
The Minecraft mod is open source and you can view the source code here.
Before we dove into building the Minecraft mod, I had to create a High Fidelity developer account. Once I created my account, I logged in and created a new app and audio space. I later used the development console for this space to create a test JWT (authentication token), which I could then use to connect to the audio space.
Just a heads up: You should never use a test JWT for production applications. But for testing purposes, such as testing this Minecraft mod, it will do the trick! Take a look at our guide to JWTs for more details.
For editing the HTML page that we use to talk to High Fidelity's Spatial Audio API, any text editor with syntax highlighting will do (For example: VSCode, Notepad++, or Geany).
There are also a few prerequisites for mod development: You need to install Java 8 and a Forge-compatible IDE. I used Eclipse but IntelliJ Idea is another popular choice, too. Either of these makes it possible to quickly reference the Forge and Minecraft code, and is generally well-suited for Java development.
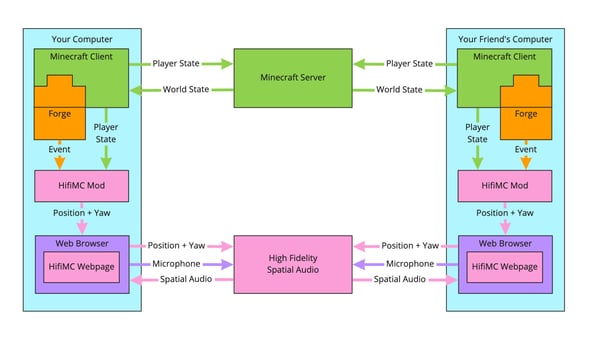
click here for a full size image
The various components of the Minecraft mod fit together like so:
In the next sections, I will talk more about how we fit those components together to transmit and receive spatial audio based on your current position in a Minecraft world.
When creating a Minecraft mod from scratch, one typically visits the Minecraft Forge website and downloads the Forge MDK for a particular Minecraft version (we downloaded the MDK for version 1.16.4). This contains the Gradle build script, Java source code and other files necessary to build a skeleton Minecraft mod. We used this as a starting point to create the mod. The file structure of our mod source code looks like this:
The next step of developing a Minecraft mod is to run the gradle wrapper. At that point, the Forge source code, decompiled Minecraft code, and every one of their runtime dependencies is at our fingertips. However, for our specific needs, we need to add a few more dependencies.
To include these additional dependencies in our mod without introducing conflicts, we “shadow” these dependencies by embedding them inside the mod's namespace. We'll spare you the details of the changes we made to our build.gradle file to get this to work. (If your build.gradle script gives you grief, email us at support@highfidelity.com and we’ll see what we can do to help.) In summary, we embed Jetty and its dependencies inside of our mod jar, so we can use the Jetty webserver.
Once that's all set up, we run ./gradlew build (or gradlew.bat build) and if all works out well, we get a shadowed jar version of our mod in build/libs with our third-party dependencies embedded inside the archive. We can verify this ourselves by using 7zip or unzip to inspect the jar's contents. (Inspecting the .class files is a bit more complicated and requires a Java decompiler)
We now have all the dependencies we need to build our Minecraft mod. Now we just have to implement the mod.
After removing the example code provided by Forge, and renaming some things, our humble skeleton mod class looks like this:
In order to get information about our client player's position and orientation, we need to “subscribe” to a Forge event. There are lots to choose from! Eventually, after searching through the Minecraft code and looking at the classes derived from Forge's base Event class, we settled on RenderTickEvent:
Implementation side note: If a mod has components meant to run on a Minecraft server, then the client-side code should have clean separation from other parts of the mod.
If all goes well, after building the mod, loading a modded instance with the mod, and entering a world, we should see a line like this repeatedly in the logs:
[Render thread/INFO] [hifimc/]: Client render tick at: eye x: 87.5, eye y: 68.62000000476837, eye z: -189.5, eye yaw: 0.0
Our event subscriber is now logging the client player's current 3D position and yaw at the render frame rate!
At this point, we now know the client player's position and yaw at eye level, with the pitch and roll known to be constants of the Minecraft engine. Now we will use this one weird trick to get the data from Java to JavaScript. (You won't believe what happens next!)
We'll use a Jetty webserver to do this, using the org.eclipse.jetty dependency we added to our mod during the gradle boilerplate process. We want our webserver to load when the game loads, so we will listen on Forge's mod event bus:
Now we initialize the Jetty server, configuring a few constants like the host name, port, max number of connections, and the connector queue size. We also configure the server to stop on shutdown:
Running the modded client and checking the logs, we can see that a webserver appears to be running:
Okay, so let's recap what's happened so far.
We set out with the goal to create a Minecraft mod which uses High Fidelity's Spatial Audio API to send and receive audio between players on a server, based on their positions in the world. Presumably because Minecraft is a fun game, especially with friends.
Everything we've done so far has just been boilerplate to get the Minecraft mod working, and to run a webserver inside of the Minecraft mod. In fact, if it weren't for the fact that we were going through the trouble of passing the player's position over the fence from a native Java game engine to a web-based JavaScript Client Library, we wouldn't have to run a webserver right now.
[In fact, another option would be to go ahead and build a native Java version of High Fidelity's existing JavaScript client library! The source code for the JavaScript version is available here if you want to try porting it to Java. We'd love to hear about it if you do!]
All of our code for sending and receiving from the Spatial Audio API could just live in a single HTML file, until we have finished testing our code and need to securely generate unique JWTs on the server-side (if you get to that point, High Fidelity's Spatial Audio API website has an article on how you can do that).
At this point, we just need to send some data to a web browser, and from there we can send data to and from High Fidelity's Spatial Audio API.
To do that, we create a Jetty web socket, which sends a position and yaw JSON to connections every 10th of a second:
We then add that socket as a handler to our server:
Implementation side note: ch.clearAliasChecks() and ch.setAllowNullPathInfo(true) let us use /locdata as the path to our websocket without the webserver mistaking it for a directory.
Then we modify our Forge event subscriber to send player data to the websocket, also converting the yaw to match High Fidelity's default Spatial Audio API coordinate system:
When the mod is loaded and we are in a Minecraft world, we can create and visit a small HTML webpage on our local computer to test that the websocket is working:
We open up the blank webpage, open up the console, and...
{"x":87.5, "y":68.62000000476837, "z":-189.5, "yaw": 211.95000076293945} 106 socket_test.html:6:21
The websocket is sending our Minecraft player's position to the webpage!
I mentioned that the websocket was the only reason we ran a webserver inside the Minecraft mod. And this is true! We will now create an HTML file to send and receive audio for spatial voice chat, using the player data from the websocket to update our position in the 3d audio space.
But this is all the JavaScript that is actually needed to connect to High Fidelity's Spatial Audio API:
To get our connection to actually send and receive audio, we will need some HTML, and of course we will also want to import the JavaScript client library:
Then we add the web socket code we tested earlier:
At this point, you and a friend could load this webpage and the Minecraft mod, join a server, and hear each other talking!
There were a few things the Minecraft mod did differently with this webpage, which we will touch briefly on:
In a rather unconventional way, we managed to create a Minecraft mod which implements 3D spatial voice chat using High Fidelity's Spatial Audio API. While we think it's pretty cool, it only scratches the surface of what's possible.
Currently, the 3D audio space you connect to is hardcoded on modpack startup. It is possible to dynamically create spaces depending on what world or dimension the player is in.
Also, High Fidelity's spatial audio API can be used for more than just audio chat. It can also be used for music, ambient environmental sounds, procedural sounds, livestream recordings and probably lots of other ideas you may have!
Feel free to check out our Minecraft mod and use it in your own experiments. If you're curious about High Fidelity's Spatial Audio API, you can learn more about it here.
Related Article:

There are countless articles, tweets, and LinkedIn posts from marketers and others expounding upon the future of virtual events and conferences; how ...
By subscribing, you agree to the High Fidelity Terms of Service

