 Categories
Online Audio Spaces Update: New Features for Virtual Event Organizers
It’s been about 8 weeks since we launched High Fidelity’s new audio spaces in beta. We really appreciate all the support, particularly if you have ...
High Fidelity is an awesome platform to build and develop not only your own places, but fun items too! We are always creating, but there is a huge potential for great things to be made if we could help our users get in on the action. The simplest way to get people started is to provide templates that are fairly easily modified, so we’ve started to build “blueprint” items. These items, available on High Fidelity’s Marketplace, have a link to the code and an instructional README file so users can download and modify them.
With the introduction of our first blueprint item, the Holiday Blaster, we wanted to make it even easier by providing this step-by-step tutorial version of the README to help people swap out the parts, change the sounds, or add new ideas. The code is heavily commented and, in conjunction with this tutorial, users should be able to gain some understanding of how to create using our API.
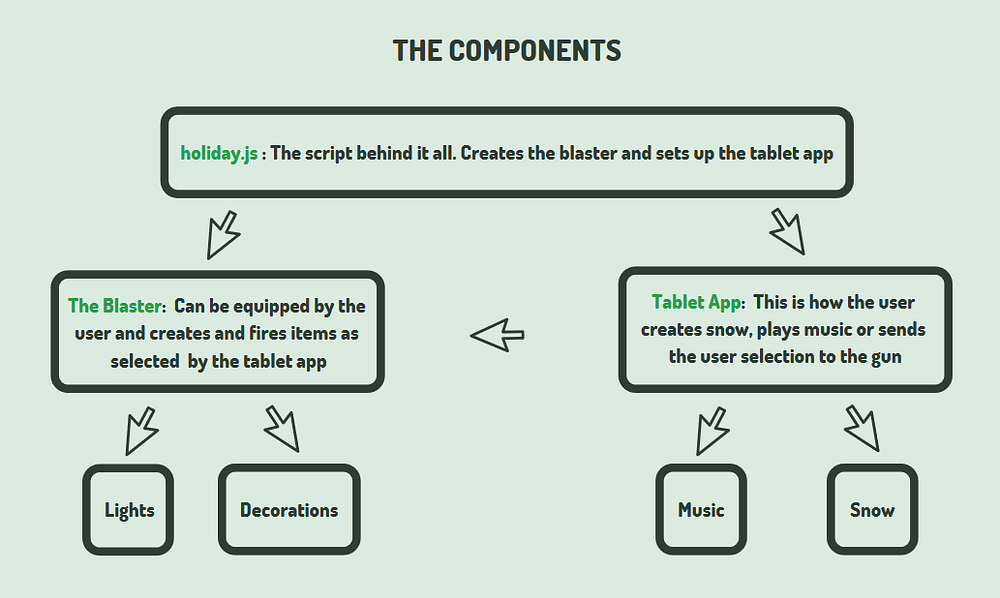
Tablet App: The Holiday App allows the user to select which item to shoot out of the blaster next. It also plays music and sound effects and creates or deletes falling snow.
The Blaster: When a user opens the Holiday App, the blaster appears in front of the user. It can shoot several types of items. When the user closes the app or changes tablet screens, the blaster disappears.
The Objects to be Fired: The blaster shoots out several types of objects that may be stickable, edible, or grow in size upon impact.
To begin working on your own version of the Holiday Blaster, you will need a place to host cloud files, such as Amazon S3, and a way to edit and manage those files. Most of our developers like to use VS Code for editing and Cloudberry or CyberDuck to edit the files directly.
Pro Tip: Beware of caching if you choose to edit directly. It is safest to reload each modified script with ?### at the end of its file name and all references to it. Be sure to change the numbers each time you change the script in order to ensure that your changes are received.
Download the entire “HolidayBlaster” folder and upload it to your cloud storage.
Step 1: To change the background image of your app you can use a .jpg, .png, or even a .gif file. Gifs are short clips of moving images and you can find and download them from Giphy. Once you have selected your desired background, upload it to your storage or copy the direct URL and paste it into the holiday.css style sheet in the ‘body’ properties.
Step 2: App buttons will be edited in holiday.html. The tablet choices are presented as button or image inputs with a unique ID that will be used to send the choice to the app. For the snow and music buttons, change the button label and select a descriptive ID as it will be used across multiple files to keep track of the event when the user presses this button.
For the rest of the buttons, you will need images of your items. Upload these images to the icons folder in assets. Set the alternative text to show in case the image cannot load and paste the link to your hosted image.
Step 3: The app is set up when holidayApp.js runs. To open the app, the user manually clicks the tablet icon. Two button images are linked in order to show whether the app is active. To change the app icon, you will need two .svg or .png icons. Save your files to the icons folder, then open holiday.html and replace the file names in the path.
These icons will be referenced later when the app is added to the tablet or toolbar by getting a reference to the tablet using the ‘Tablet’ API, pointing the page to your html file, and creating the button. The name that will appear under the app image can be changed here as well by changing the “text” property.
Step 1: Find or create a new model for your blaster. If you are a 3D modeler, make your own! If not, you can find some cool 3D objects on Google Poly, TurboSquid, Sketchfab, or the Unity Asset Store. Be sure to credit the artists in the item description when necessary. Upload your model to the models folder under assets.
Step 2: In High Fidelity, open the Create app in a domain in which you have create permissions. You can use your Sandbox or the public domain called “Maker”. In the Create Tools window, select ‘model’, paste in the URL to your new blaster, and click ‘Add’ to create the new item. Change the size and any other desired properties of your item and then, with the item selected, click ‘Export Selection’ in the ‘Entity List’ window and save the file.
Step 3: You have a JSON file with the properties of your blaster now to use as a reference when changing the properties that will be created in holidayApp.js.
Step 1: Create a particle effect in High Fidelity and then export it to a JSON file using the method described above in step 2 of ‘Changing the Look of the Blaster’.
Step 2: Open holidayApp.js and replace the properties of the particle in the function ‘Create Snow’. You may rename this function, just be sure to do a careful search and replace to make sure you rename all instances of it.
Step 1: Collect your app opening sound and music. You can find lots of audio on Freesound or StoryBlocks. Save these files as .mp3 or .wav at 48000hz and upload to the sounds folder. At the top of holidayApp.js, set up each file to be processed using the SoundCache API, placing your music links in the SONG_# variables and your app sound in the BELLS_SOUND variable.
Step 1: Collect your 3D assets by making them yourself or using the sites listed above under step 1 of ‘Changing the Look of the Blaster’.
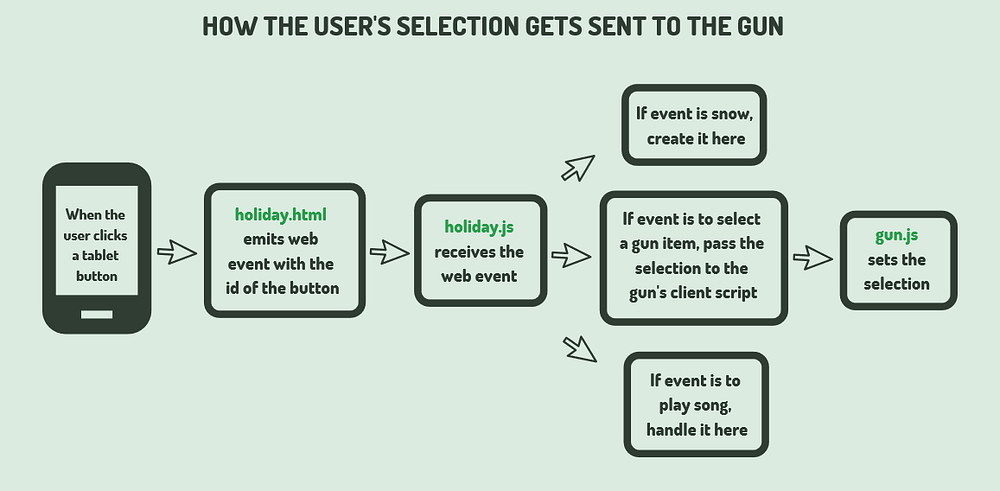
Step 2: Change your app buttons to reflect your new items using the section “Changing the Look of the App” and then change the web events to reflect these changes for each button. The html file has a javascript section that includes listeners for each button, listed by ID. When the button is clicked, it sets up an event and sends it over the EventBridge to be received by holidayApp.js. The event includes a unique identifier for this app to prevent other apps from trying to process the event. Using the button ID for the event type makes it easy to keep track of what is happening throughout the entire process, from tablet click to blaster selection.
Step 3: Open holidayApp.js and scroll to the ‘onWebEventReceived’ function. There is a switch that lists each ID from the steps above. Change these to match your button IDs.
Step 4: The final step is to change the properties of the items when they are added. Follow steps 2 and 3 of “Changing the Look of the Blaster” to get a JSON of each item scaled down so that the maximum value of any dimension property is no more than 0.1m. Enter these properties for each item and change its name variable if you’d like — just be sure to change the same variable throughout the document.
That’s everything you should need, so go and get the free “Holiday Blaster” from the Marketplace and start making it your own. We can’t wait to see what you can create with this. We encourage you to share your modified versions — tag us on social, @HighFidelityVR (Twitter, Facebook, Instagram).
Related Article:
.jpg)
It’s been about 8 weeks since we launched High Fidelity’s new audio spaces in beta. We really appreciate all the support, particularly if you have ...
By subscribing, you agree to the High Fidelity Terms of Service

